
How To Send Announcement Email to Club Members
Club Announcements are emailed to all members using our email management service, MailChimp. Any board member can send an email by logging in to MailChimp, and when sent to the appropriate list, all members will receive it.
To make things as simple as possible, we have created a number of templates that shortcut some of the content and formatting of email.
Log in to MailChimp
MailChimp: www.mailchimp.com
Username: ***
Password: ***
Contact webmonkey at harpeth bike club dot com for credentials.
****************
Basic MailChimp Concepts:
Lists: lists of people who we can email. The “HBC 2019 Member List” is the accurate one, and is synced with our membership database. When details about a member and their membership status changes, those updates are automatically synced to their entry in THIS LIST in MailChimp.
Segments: Smaller groups of people within our main lists (kinda like lists within lists) that share some common attribute. For example, we have a segment of people with individual memberships, and a segment of people with family memberships. People move in and out of segments automatically if their details change.
Campaigns: Emails, basically. Each email sent is a campaign.
Templates: Pre-formatted emails that can be re-used each time we send a campaign, so you don’t have to start with a blank page.
**********************
How To Send an Email:

Step 3: Click “Email” here.

Step 4 and 5: Enter an (internal-only) name for the email and click Begin.
Log in to Mailchimp as outlined above.
Click Create in the top right.
Choose Email in the sidebar of the window that opens. A new window will open that starts with the header “Create an email.”
In the single field on this screen, enter a Name for the the campaign (email). No one sees this except us board members, so there’s little pressure to do this “right” — but ideally you’d give this a name that would make it easy to sort through these in the future. For example:
Weekly Rides March 1
Cancellation March 1
Weekend Rides March 5
Spring Social Reminder April 1
With a name, input, click Begin. A new screen will appear, with the name of the Campaign at the top, and sections that represent the details about the campaign below. In the following steps, we’ll go through each of the details one by one. After editing any component of the email, you’ll return to this screen — and when you’ve edited all the applicable details you’ll send the email from this screen.
Manage Email Details
In the “To” area, click Add Recipients.
A dropdown form field will appear. Click it and choose “HBC 2019 Member List” from the option. Selecting this means that all active members will receive the email once we send it later in this process.
In the “Segment or Tag” field that appears, leave it as is. This allows us to send to segments of the main list, but only applies to special email campaigns in which the HBC Webmaster would be involved.
Leave the “Personalize the To Field” checkbox empty.
Click Save to go back to the main campaign editing screen.
In the “From” area, do nothing. The only times you’d edit this is if you don’t want this email to come from ridechair@harpethbikeclub.com. It would be rare that we’d change this. (If you want to change it, click Edit From and change the Email Address field to president@harpethbikeclub.com.)
In the “Subject” section, click Add Subject.
In the Subject field, give the email a helpful subject line. Remember that club members will see this, so enter something that would be helpful. For example:
Reminder - Weekend Rides
This Week’s Rides — June 17 - 25
Today’s Ride is ON!
Today’s Ride is CANCELLED!
Leave the “Preview text” field blank.
Click Save to go back to the main campaign editing screen.
In the “Content” section, click Design Email. This is the biggest step, where we’ll add the actual written content of the email. Move on to the next section below for details.

The main email details screen. You’ll edit the email section by section, as outlined in steps 1, 2, 3, and 4 here.

Editing the TO field, as described in Step 1.

Editing the subject, as outlined in Step 3.
Write & Design Your Email

The first step in designing the email content is selected a template. Click “Saved Templates” above the purple box, as described in Step 1.
Part of sending an email is designing it. It’s not as hard as you’d think. It’s strongly recommended you use a template in order to save yourself some work and to keep the formatting clean.

Choose a template as outlined in Step 2.

Click the content section on the right you want to edit, as described in Step 3. Then edit the content on the right as described in Step 4. Then click Save and Close as described in Steps 5 and 6.
After clicking Design Email (see step 9 above) a new window will appear, which walks you through designing your email step by step. The first step is “Select a Template.” Just below the header text, you’ll see 5 text options, with “Layouts” selected. Click “Saved Templates” to display all of our club’s custom templates.
You’ll see five templates displayed on the page. Click the template option that’s most applicable to the email you’re going to send. Ultimately, all our templates are very similar but you’ll save yourself a few edits if you pick the most applicable option. A new screen will appear.
On the left hand panel of this new window, you’ll see a preview of your email. Hover your cursor over the content section (not the logo, the written content below it) to make a black bar appear at the top. Click the Pencil icon in that black bar, or click anywhere in the content section. The panel on the right will change and give you controls the edit the content.
On the right hand panel, edit the content by highlighting content, changing words, or deleting any of the unnecessary content. You may choose to copy and paste content from our Older Club Calendar content (see this article for more detail). I’d strongly suggest you do as little formatting as possible — just change the elements that need to change and copy/paste as much as possible to save yourself the effort of editing.
When your content editing is finished, click the Save and Close button below the content on the right hand panel. This saves your content.
Click the teal Save and Close button in the bottom right to finish — you’re returned to the main email editing screen, and your progress now shows a preview of your email in the “:Content” section.
Attaching Links and Files to Emails
It is common to add a link (for example, to a Ride With GPS route) or attach a file (a PDF cue sheet) to an email. Note that if you’re copying content from the website and that content includes links, you do not need to “re-create” those links in the email — the links will copy over fine. But if you’re composing in MailChimp and want to create links from scratch, follow the instructions below.

The editing Toolbar in Mailchimp.

Highlight the text you would like to make a link or a file attachment.
Click the paperclip icon in the tool bar (circled in red, above). A window will open.
Do one of the following, depending on the type of link you’re intending to add:
If you’re linking to a webpage, enter the web address to which you would like to link in the Web Address (URL) field, and click Insert.
If you’re linking to a file, click the dropdown field labeled Link To and select File from the bottom of the list. A new page will appear (shown below) which shows all files that have previously been uploaded to MailChimp. Assuming the file you want is not already on this page because it has not been uploaded, click Upload in the top right corner. Select a file from your computer and upload it to MailChimp. Once it has uploaded it will appear at the top left of the page. Click it to select it — indicated by a check mark — and click Insert in the top right. NOTE: Be sure the only ONE file is selected on this page — the Insert button will be disabled until one file is selected.

The File Management page (see final step above)
Send Your Email
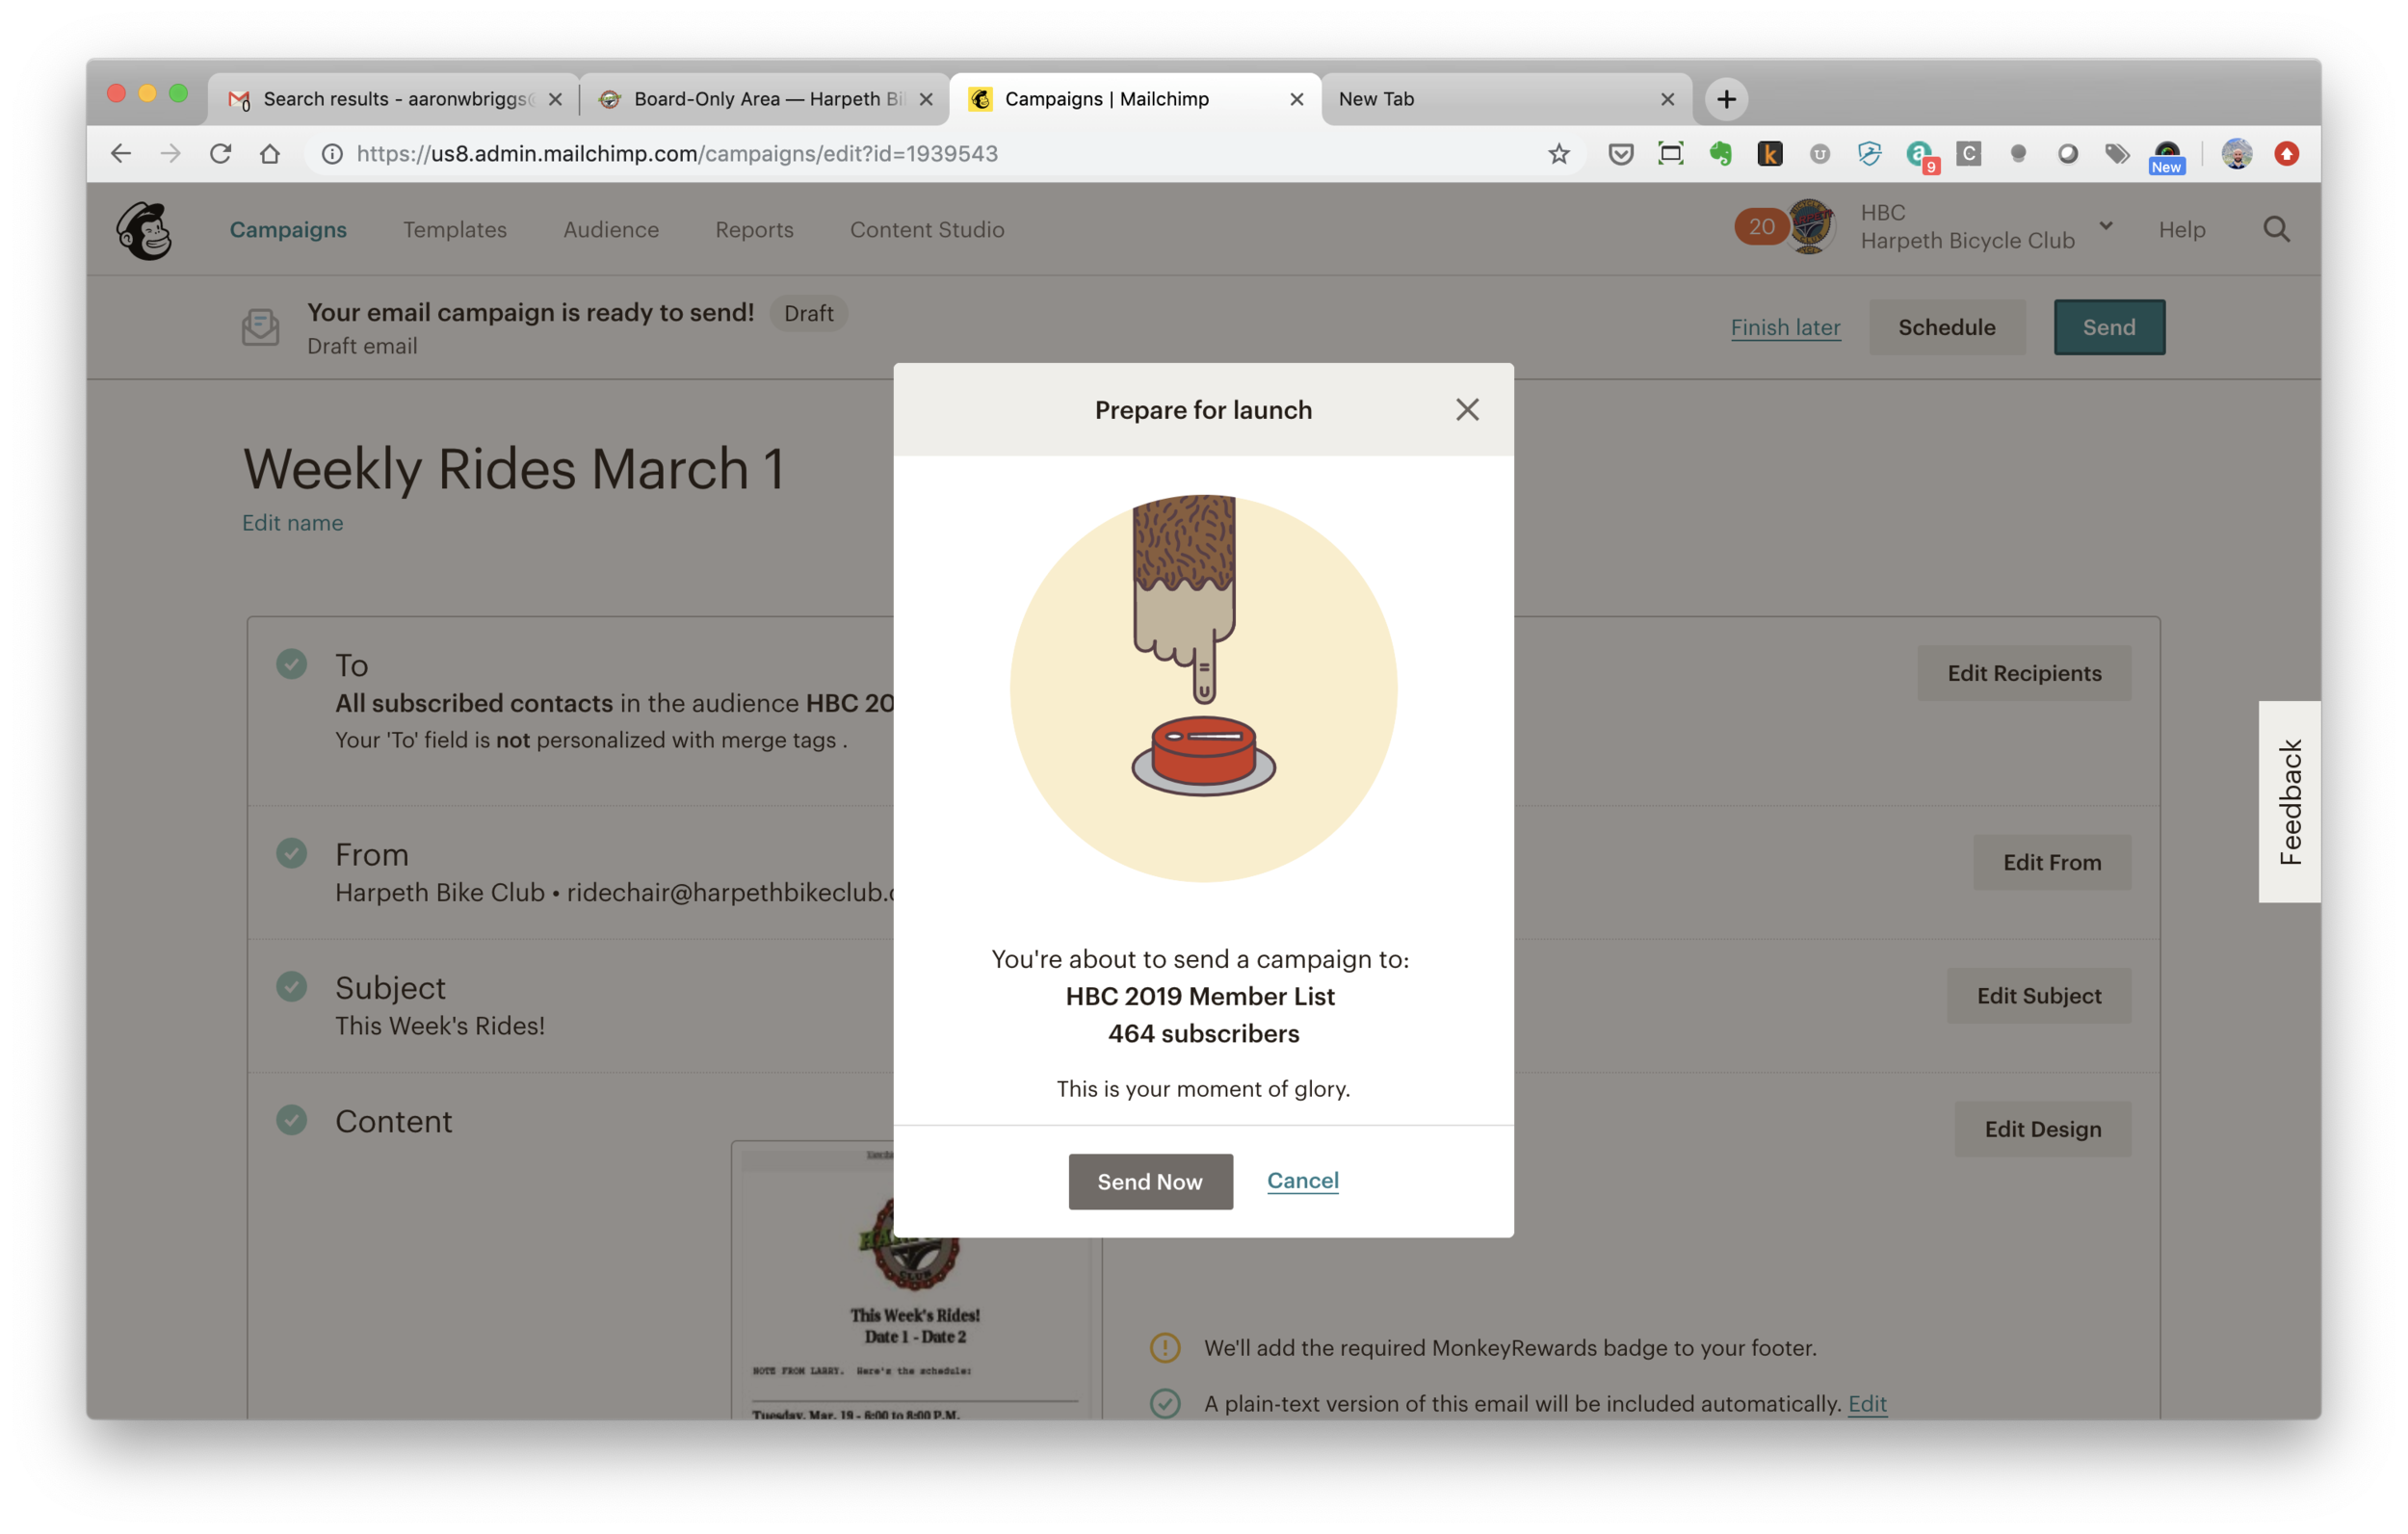
See Steps 1 and 2 — click SEND at the top of the page, and then the sweaty monkey hand appears. Click SEND NOW.
If you’d like, review your settings. You can scroll on this page to see all the details configured in previous steps. You can change anything — To, From, Subject, and Content. If you’re happy with the settings, click Send in the top right. A confirmation with a sweaty monkey hand appears.
Click Send Now to send the email immediately.
Scheduling Emails

Rewind one step — if you don’t want to send your email right away, you can also schedule emails for the future. This is handy if you’re lining up emails at the beginning of the week and want them to auto-send all week (eg., when Larry goes to Italy.) To do so:
Instead of clicking “Send” in step 1 above, click Schedule.
Choose a delivery date and time for this campaign.
Click Schedule Campaign.
Viewing or Editing Old (or Scheduled) Campaigns

You can view any old campaign, any campaign that has been scheduled to send in the future, or any campaign in “Draft” mode (meaning that you’ve saved it but haven’t sent it or scheduled it yet). If the campaign is saved for the future, you can make edits to it before it sends if you’d wish. Once a campaign has sent, you can’t make changes to it but you can go back and see the content and view stats about how many people received it or opened it.
Click Campaigns in the top left of MailChimp.
Click the options under View by Status on the left to change which campaigns you’re viewing.
The Recent option (default) displays any sent campaigns, in reverse order with most recent at the top. Note that any scheduled campaigns with show her.
The Ongoing option displays special campaigns that are set to auto-send when certain things happen. We only have one: a welcome email that is sent to members when they first create a membership.
The Draft option shows any campaigns you have saved but not sent or scheduled yet. If you don’t have any drafts, this will be empty.
The Completed option shows all campaigns that have finished sending, in reverse order with most recent at top. This view won’t show scheduled campaigns.
Click the name of a campaign to view details about it. If the campaign has not sent yet (either because it’s a draft or a scheduled campaign), you’ll see the same details as if you were creating it and you can change details. If the campaign has sent already, you can see the content and see details about who received, opened, and clicked on it.